
Presse universelle MecaMotion par 
Zeroing of the encoder
Before making any movement, you must set the encoder to zero. Without this, as the value of the encoder is not known, there is a risk of collision.
To perform this zeroing, if you are not in standalone mode, the press must be connected to a PLC in order to be able to use run on sight mode (JOG mode).
Procedure to follow for zeroing the encoder
1.In the project tree of the MecaMotion software, right-click on the "Press" tab, in the drop-down menu that appears, select "Expert control". The window in Figure 1 opens.
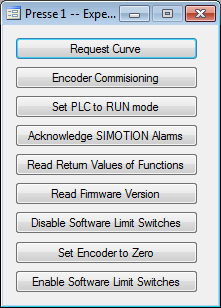
Figure 1: "Expert" control menu
2.Once this menu is open, the first step to perform to zero the encoder is to disable the software limit switches. To do this, click on the "Disable software limit switches" button.
3.As soon as the software limit switches have been deactivated, it is possible to manipulate the axis using the "JOG+" and "JOG-" commands. These commands are sent to the press by the PLC, via the PROFINET bus or from the manual mode of the control page, if you work in standalone mode.
4.Using the commands JOG+ and JOG-, position the axis to "0 mechanical".
5.When the axis is at the position you have decided as the "Zero" position, you must learn this position. To do this, in the "Expert control" window, click on the "set encoder to zero" button.
6.When the zeroing is done, all that remains is to reactivate the software limit switches. To do this, in the "Expert control" window, click on the "Enable software limit switches" button.
Note: If part programs have been created with another "0 mechanical", the position values will no longer be valid. /!Beware of the risk of breakage /!\ |
