
Presse universelle MecaMotion par 
Standalone mode
The "Standalone" mode allows to work with the press without PLC.
All the commands required to control the press are then gathered in MecaMotion (press programming software).
Switch to "Standalone" mode
To operate the press in "Standalone" mode, you must modify parameter n°28 (communication) of the press and choose "Standalone". (see figure 2)
The parameters window is accessible from the project tree. (see figure 1)
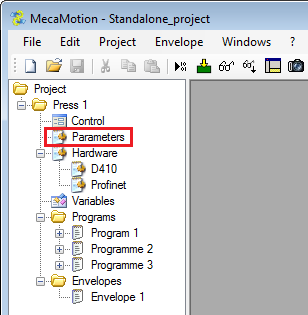
Figure 1: Project parameters
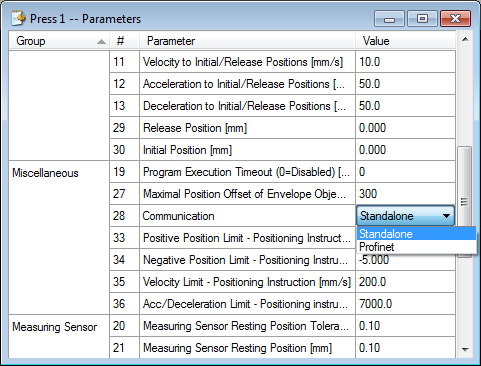
Figure 2: Standalone mode project parameters
Parameters and results in a program
When working in "Standalone" mode, it is possible, for each program, to add variables to enter parameters and variables to receive results. These variables can then be used directly in the part-program.
You can also define a return variable to view the good/bad parts and whether or not you want to display the envelope on the graph in the control page. (see figure 4)
In the project tree structure, the "parameters/results" window is located below the program. (see figure 3)
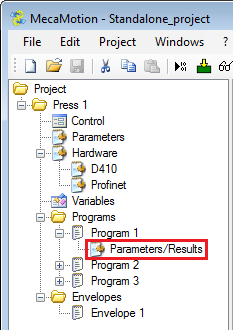
Figure 3: Parameters/results

Figure 4: Parameters/results window
Once you have completed a cycle, you will find the results variables in the results table (bottom left of figure 5).
In the window below, you will find the different values of the result variable "Force_result" measured over several cycles.
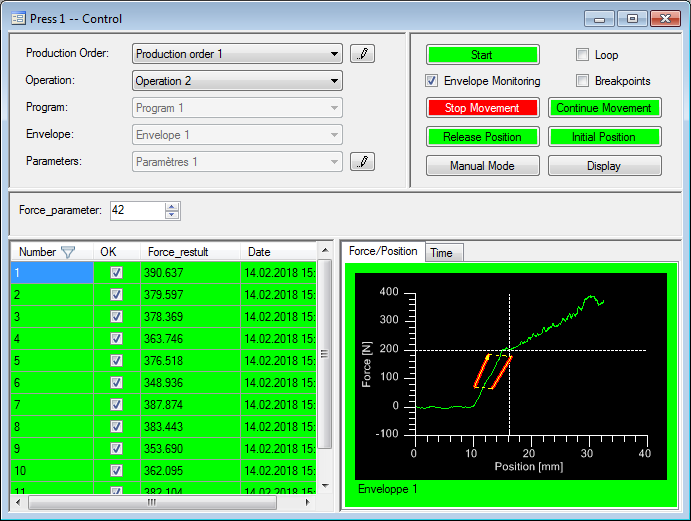
Figure 5: Viewing the value of the results
Press control
In "Standalone" mode, the press is controlled from the "control" window which is accessible in the project tree structure.
In this window, you can select and create production orders, enter parameter values and view the results. (see figure 6)
When you change an input parameter of the program you are going to start (example: Force_parameter), you are not required to load the project, the new value of the parameter will be sent when the program is started.
Important, in order to be able to save the results, the database must be active.
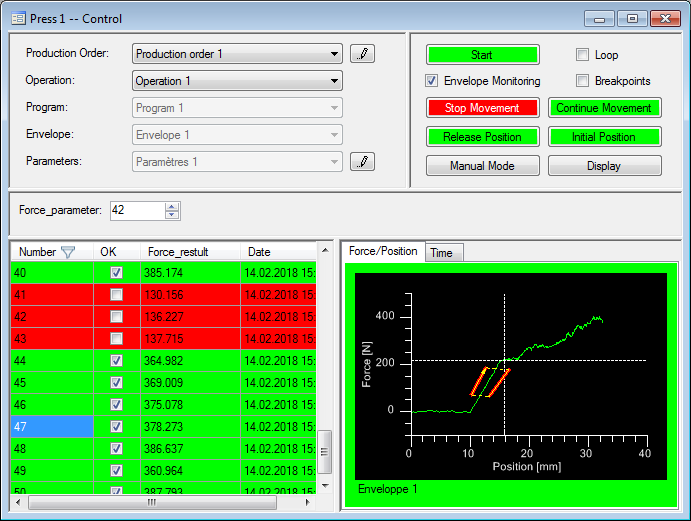
Figure 6: Control window
At the top right of the "control" window are all the buttons necessary to control the automatic cycle but also access to the manual mode.

Figure 7: Automatic controls
The buttons on the control page (figure 7) have the following functions:
•The "start" button is used to start the selected program.
•The "stop movement" button stops the axis movement and pauses the execution of the part-program.
•The "continue movement" button restarts the axis movement and the execution of the part-program.
•The "release position" button is used to stop the movement of the axis and then make a movement towards the release position defined in the parameters.
•The "initial position" button is used to stop the movement of the axis and then make a movement towards the initial position defined in the parameters.
•If the "loop" box is checked, the selected program will run in loop.
•The "envelope monitoring" box is used to activate/deactivate the programmed reaction if the envelope tolerances are exceeded.
•The "breakpoints" box is used to carry out the programmed breakpoints. To continue after a breakpoint, you must click on the "start" button (named "continue" when the program is stopped at a breakpoint).
The "display" button accesses a window in which the axis position, force value, measuring sensor value and microswitch status are displayed in real time.
Creating a production order and a parameter set
The creation of a production order and a set of parameters is done from the control page. (see figure 8)

Figure 8: Creating a production order and parameter set
To create a production order, you must click on the button"..." next to the line "production order" (figure 8). The window below opens (figure 9), in which you must give a name to the production order and then add one or more operations.
These operations are necessarily composed of a program with its set of parameters and if necessary you can add an envelope.
As long as you have not performed a cycle with an operation, it is possible to modify its configuration, after having performed a cycle, you can no longer modify it.
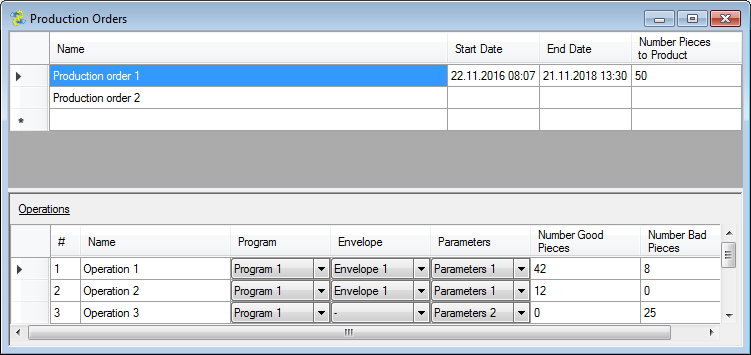
Figure 9: Creating a production order
Parameter sets allow you to save several parameter values for a single program and thus make it easier to change the values. To create them, click on the "..." button next to the "parameters" line. (figure 8)
The parameters that make up the set are located in the center of the "control" window, so you can enter the values of the parameters of each set by selecting it.
Once you have started a cycle, the selected parameter set will remain the same for the selected operation, to perform a cycle with a new parameter set, you must create a new operation.
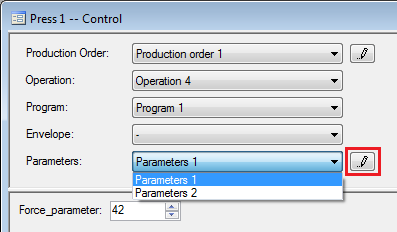
Figure 10: Creating parameter sets
Method of using the control page
Once you have created the production order, on the order page, choose the production order and the operation to be carried out.
Before starting the cycle, you must check the boxes if you want to work with or without the envelope and with or without the breakpoints. You can then start the cycle using the "Start" button.
When the program is finished, the results are automatically retrieved. (Curve, tolerance feedback, results variables and part ok/not ok) It is possible to automatically display the last result when it is received, to do so, right-click on the results table and choose "Automatically select new results".
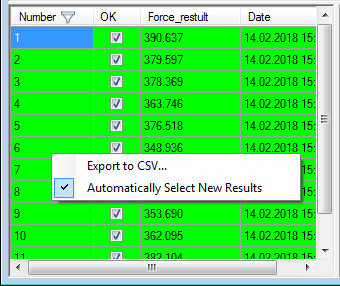
Figure 11: Automatic display of the last result
Curves
At the bottom right of the "control" window, you can view the force curve in relation to the position but also the force in time and the position in time. (see figures 12 and 13)
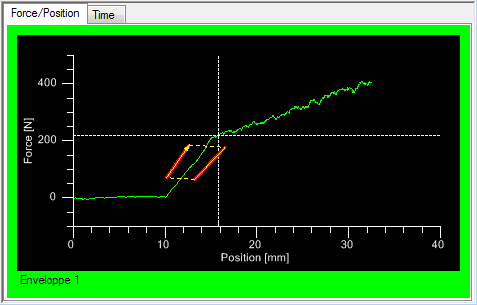
Figure 12: Force/position curve
In figure 13, the force appears in purple and the position in green. You can view the curves on separate graphs or on the same graph by clicking on the "overlapped graphs" button.
When the curves are overlapped on the same graph, you must place the cursor on one of the two for the force scale or position scale to be displayed.

Figure 13: Force/time and position/time curves
Data base
If you want to delete a production order and its results, click on "file" in the menu bar and then "database". In this window you can delete production orders that you no longer need.
From this window (figure 14), you can export the database in ".sql" format to be used on another workstation for example. To do this, click on the "export" button to save the database in a".sql" file format and then transfer the file to the new workstation. Afterwards, from MecaMotion, open the ".sql" file using the "import" button, all the production orders of the project will then be added in the "results management" field.

Figure 14: Database
Press control in manual mode
The press is controlled in manual mode from the control page by clicking on the "manual mode" button.
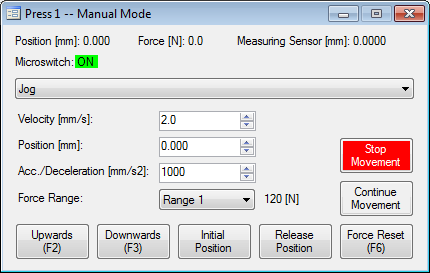
Figure 15 : Manual mode
This manual mode allows you to move the axis in run on sight and perform movements by giving relative or absolute position setpoints.
If you perform manual positioning, you must choose the speed, position and ramp (acceleration/deceleration). When a positioning is in progress, you can stop the movement at any time and then restart using the "stop movement" and "continue movement" buttons.
At the top of the window are displayed, the axis position, force value, measuring sensor value and micro switch status in real time.
From this window, it is also possible to move the axis to the initial or release position, select the range of the force sensor and reset the force sensor.
Errors
When an error occurs, the "Warning" triangle at the bottom right of the software will blink. If you click on it, the list of errors present is displayed, you can acknowledge them using the "ACK" button. You will find the list of errors in the PROFINET error list.

Figure 16 : Errors
Production mode
In the production mode you will find all the functions of the "control" window with a simplified layout to make it easier for the operator to use.
You can protect access to the edit mode and production mode with passwords.
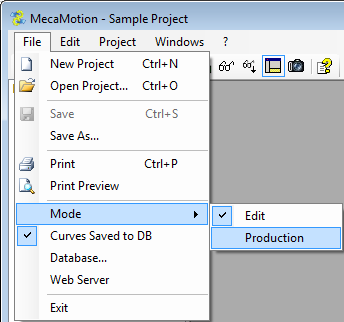
Figure 17: Access to production mode
If you want to return to edit mode, click on the production tab at the top left and then on the parameters tab at the right. On this window is the "project editor" button to return to edit mode. (Figure 18)
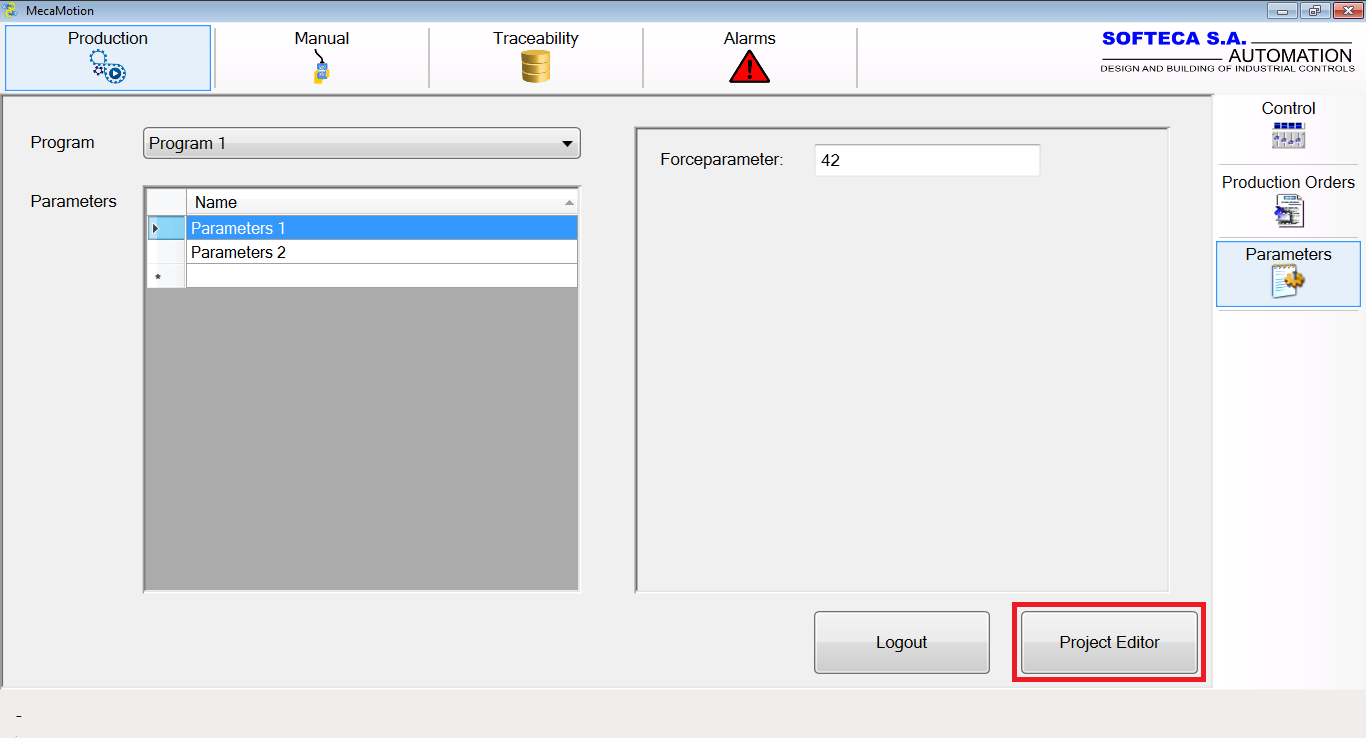
Figure 18: Return to editing mode
